Friday, July 24, 2009

The Swiss Girls

Did I ever tell the story about the Swiss Girls who we met at the Dead Sea in Israel? I don't think that I did, because I don't think that I told many stories at all about Israel. Our stolen luggage really soured the trip more than I wanted it to, and that tends to be what I focus on when recalling our time there. But we have some great stories, and this is one of them.

The Swiss Girls


Okay, so here's the story:

Richard and I went to the Dead Sea after a long hike in Ein Gedi. We were on our way back to the hostel in Masada and saw two girls sitting in the bus shelter at the side of the road. Richard slowed the car down (he admitted afterward that it was because he was trying to figure out why they were sitting in a bus shelter in the middle of the desert) and they walked over to us. Realizing that we had just unintentionally offered to give them a lift, we asked where they were going and they told us that they were headed to the same hostel as us. So we picked them up and drove them to the hostel, and when we got there and the kitchen was closed we invited them to come into a nearby town with us to get some dinner.

Rebekka spoke better English than Miriam, so she did most of the talking. They were visiting her cousin who lives in Jerusalem and decided to go on a day trip on the bus, which was how they ended up at the Dead Sea. They were going to Jerusalem on the same day as us, so we offered to give them a lift. We told them about our stolen luggage and they said that they'd wake us up for our 4am hike up Masada because they had an alarm clock and we didn't.

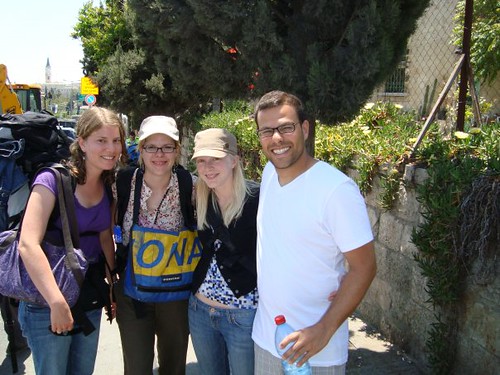
So we hiked up Masada the next day with the Swiss Girls and then later that day we drove to Jerusalem with the Swiss Girls. Richard impressed them with his knowledge of German (which he learned from Baba Luba, who speaks Yiddish), and they taught us some funny words in Swiss German. The Pope was in Jerusalem that day and traffic was terrible. We finally pulled into the first parking lot we found and parked there. Miriam got so excited when she got out of the car: We were parked in front of the Swiss Embassy! She went over and talked to them and they promised to keep an eye on our car for us.

We parted ways with the girls shortly after that. They took a bus to Rebekka's cousin's place. Before they left they tried to give us money, which we refused because it didn't cost us anything to help them out and we enjoyed their company too much to feel that they were a burden in any way. Miriam told us "You saved us! We're going to send you SO MUCH Swiss chocolate!"

Today, Richard called me at work to say that he got a big package in the mail. When he opened it there was SO MUCH Swiss chocolate inside!

Chocolate from the Swiss Girls we met in Israel
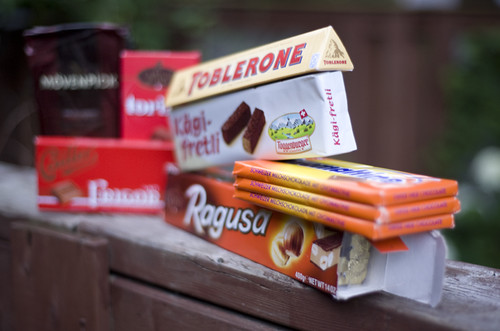
Tons of chocolate! Plus a bag of coffee. :)

"Made in Switzerland" was circled just in case we were curious.
On every single bar, they circled "Made in Switzerland". Haha.

Thursday, July 23, 2009

A foodie interlude.

In Toronto every year at around this time all of the foodies go crazy over these sweet Pakistani mangoes. Last year we went looking for them in Little India but couldn't find any.

This year, I went searching for mangoes alone. To be honest, Little India scares me a little bit. And this year Little India was even less appealing than I remember it. The garbage strike probably has a lot to do with that. Some areas of the city are worse than others and the few blocks of Gerrard street that Little India occupies are some of the worst that I've seen so far. We're about 5 weeks in now, which means that no garbage has been collected from the public waste bins in that long. Just imagine! The regular streetcar stop had been moved one lamp pole west because the bin beside the normal stop was stuffed full and had fallen open and was overflowing onto the street. The smell is not pleasant.

Still, I toughed it out because R seemed really keen to try these special little mangoes. I finally found a store selling them in 3kg boxes (apparently they're so popular that there's no point in selling them individually) and picked through them to find what I thought was the best one. I took it into the store to pay and the owner of the store took me back outside and looked through all of the boxes with me again. It was pretty obvious to me that he wanted to make sure that I got a good first impression of these things. He told me that once I've had these mangoes I'll never want to eat the ones from Mexico again. Guaranteed! He found me a better box and I paid him my $16. Yes, $16 for 8 mangoes. Twice what I'd pay for the Mexican ones. I left the store thinking: These had better be good.

Honey Mangoes from Pakistan


I immediately loved the packaging. I adore the very 1970s Indian looking box with bold colours (I want to keep it to use it for storage!), and each of the mangoes has a sticker with ribbons coming out of it. Really cute.

So... How did they taste, you ask? Well, they didn't smell any different than regular mangoes so I didn't have very high expectations. I cut one open and it looked like a regular mango on the inside, but it was a little juicier. I put it in a bowl and brought it to R, but he let me have the first taste.

I was completely blown away! I've never tasted a fruit that was so naturally sweet. It was completely amazing. We've been making mango lassis with them every night since then, but with these mangoes you don't need to add any sugar at all.

The guy in Little India was right. I never want to eat another Mexican mango again.

Tuesday, June 23, 2009

Hummus!


On Sunday, R and I had my dad and his girlfriend over for Father's Day. We took them for a bike ride at one of our favourite spots and then cooked them a barbecue dinner: Mengal style! We made skewered chicken, Israeli salad, and (of course) fresh hummus.

I'll admit that R took care of almost everything this time around. I tried to help, but he's become the barbecue expert in our household. It's just one of those stereotypical male roles, I guess. I plan on learning more about how to prepare the shish-kebabs (or, as the Israelis call them: shishleek), because the marinade looks really simple and they taste delicious.

Today I've got a recipe for hummus to share with you. I love warm hummus with pita bread! It's the perfect snack when you're too lazy to make a real dinner (which is pretty often during the summer). It also tastes great as a dip for those shishleek I was talking about.


Homemade Hummus

Ingredients:
Juice of 1 whole lemon
1 tsp lemon zest (optional)
2 cups cooked chick peas with a bit of their water*
1 cup tahina
3 garlic cloves
1/4 cup olive oil
2 tsp salt
fresh ground pepper

Directions:
1. Drop everything in the food processor and blend until creamy.
2. Enjoy. Best served warm with a pool of olive oil in the middle and paprika sprinkled 'round the outside.


*Canned chickpeas work for this too, but we've just started cooking dried ones in our slow cooker and it's a cinch. Just put 2 cups of dried chickpeas in 6 cups of water and heat on low overnight or all day (about 8 hours). No soaking required.

My first interview!

Lex, the brains behind the new online store Uptown Avenue, recently interviewed me for her blog. Check it out HERE. There are lots of cute things in her store too, so don't forget to take a look around! Don't you just love this adorable USB hub?:


I've got a great recipe for hummus coming up this week, so check back soon. R has been recipe testing for weeks and finally made the perfect batch!

Tuesday, June 9, 2009

Lychee cupcakes with coconut glaze

Lychee cupcakes with coconut glaze


Yes! I baked last night! It was a good feeling. It's been a long time since the Kitchenaid mixer and I have bonded.

A while ago I bought Vegan Cupcakes Take Over The World for one simple reason: Vegan=pareve! This is a book of dairy free cupcakes that can be brought to any dinner without worrying about whether or not the host is serving meat as the main course. Brilliant!

Yesterday I found canned lychees AND canned coconut on sale! Then I got inspired and decided to give my own spin to the lychee cupcake recipe in Vegan Cupcakes Take Over The World:


Pareve Lychee Coconut Cupcakes

Ingredients:
2 cups cake flour
1 and 1/2 teaspoons baking powder
1/2 teaspoon salt
1 and 1/3 cups granulated sugar
2 eggs
1/3 cup oil
1/4 cup coconut milk
4 ounces (1 can) lychee fruit, drained and chopped, syrup reserved
1/4 cup lychee syrup

Directions:
1. Preheat oven to 350 degrees F. Line a muffin pan with cupcake liners.
2. In a large bowl sift together flour, baking powder, salt and sugar.
3. In a separate medium bowl, beat eggs. Add oil, coconut milk, chopped lychees, and lychee nectar to the eggs and mix to combine.
4. Add wet mixture to the dry ingredients, mix to combine. Fill cupcake liners full.
5. Bake 22-25 minutes or until a toothpick comes out clean.

Coconut glaze (optional):
Ingredients:
2 cups sifted powdered sugar
1/4 cup coconut milk

Directions:
Mix powdered sugar and coconut milk until smooth. Drizzle over completely cooled cupcakes.


Note: Malee Brand Canned Lychee In Syrup is OK Kosher certified. If you can't find a kosher can of lychee, substitute 4 ounces of fresh lychee and 1/4 cup of lychee juice or nectar. If you can't find kosher coconut milk, there are directions here for making your own.


Friday, June 5, 2009

“...the Lord gave, and the Lord hath taken away...” (Job 1:21)

So, how was the Hold Land? Everybody has been asking us since we returned and I'm faced with a difficult decision every time they do.

Do I tell them the most interesting (and disappointing) part? Or do I focus on the good things and leave that bit out?

The truth is that while we were in Israel, at noon on our 3rd day in the country, all of our luggage and bags were stolen from the trunk of our rented hatchback car. We went to see the ruins in Caesaria on our way from Tel Aviv up to the Golan and when we returned to the parking lot everything was missing, but there wasn't even a scratch on the car itself! The thieves were clearly experts. They jimmied the lock very carefully and took off with our bags without leaving more than a few fingerprints for the cops to use to find them. The only thing they left was our bag of dirty laundry. We were left with nothing but that bag and the clothes on our backs. I had my camera with me of course, so that wasn't stolen either. But my laptop, my wallet, and my passport were all in the backpack that we had decided to leave in the car (after all, we were only going to be gone for an hour). So they were all gone. We had to spend the rest of that day filing a police report, and all of the next day at the Canadian consulate in Tel Aviv to apply for a replacement passport for myself. I learned quickly that the Hebrew word for passport is "darkon".

I tried really hard to enjoy the trip anyway. We bought new clothes and carried on as if everything was fine. We stayed in Rosh Pina for 3 nights. The couple who owned the guest house were so sweet. We told them what happened and they offered to make us dinner that night, then gave me a pair of shoes (I was wearing sandals the day our luggage was stolen) and gave R one of their son's old army t-shirts. They offered to wash our dirty laundry for us so that we could have clean underwear. The day that we left they gave us one of their old suitcases.

Everybody who heard our story offered to give us something or help us out. The police officer who filed our report gave us a hat from a special even that he attended - It has the Israeli police logo on it and R wore it hiking so it was put to good use. The officer even offered to put us up for the night in his parents' house if we didn't have a place to stay (but we did). The security guard at the Canadian consulate offered to make tea for me while I was waiting to apply for my passport. Complete strangers let us use their cell phones and laptops. It made us feel so much better, after everything that had happened, to know that people cared about us and wanted to help.

Now that we're home everything is more or less back to normal. I have shoes and underwear again! We filed a claim for insurance and now we're just waiting to find out how we can get our things replaced. I haven't had a laptop for a month now. This is the longest I've been without my own computer since I was 17!

So is that a good reason for not updating at all in May? I sure hope so. I'm hoping to do some more cooking and baking soon, but in the mean time here are a few photos that you might enjoy:

The western wall at night.
The Western Wall at night.

Jerusalem at night.
Jerusalem at night, from the Hebrew U campus.

Marching to the Western Wall
A group of kids were following behind these drummers, chanting in Hebrew. It was an emotionally exhilarating trip to the Western Wall with these people behind us!

Richard, looking down the Snake Path up Masada.
The snake path, which we took to the top of Masada at 4am to catch the sunrise.

Sunset in Tzfat
Sunset in Tzfat (Safed).


I'll post about the good bits of our trip next, because there really were some great things about Israel, and it was a very different experience this time because I'm so close to being finished my conversion to Judaism. I'm working on a recipe for shakshuka (a great tomato/egg thing that they make in Israel for breakfast), so when I get a chance I'll share that too!

Monday, April 20, 2009

Deconstructed Hummus

Okay, my goal was to post here three times a month at the LEAST, but I think that I've been pretty bad at keeping my promise to do that.

But to be fair, I've been busy! R's sister AND brother both had babies last month and since his sister lives in Calgary and had a baby boy, we flew to Calgary for thebris. Happily for us, the bris was a day before Passover, so we got to spend Passover with all of R's family and extended family. Sadly for any readers I may have out there, that means that I didn't make anything for Passover and thus have no tasty Passover recipes to share.

Let me tell you though: I love Passover seders. I love chicken soup with matzoh balls and I looooove horseradish on matzoh. And of course I love brisket. Who doesn't? And this year I had some absolutely addictive chocolate toffee matzoh, which I will definitely post a recipe for next year. The bread of affliction has never been so delicious!

Anyway, I feel guilty for my neglect lately. So while I can't share any Passover recipes, I will share this snack that I like to make when I'm too busy to make a real lunch. It's like hummus, except that there's no fatty tahina (sesame oil) and there's no need to find pita for dipping. All you need is a fork!


Deconstructed Hummus

Ingredients:
1 can of chickpeas, drained
1 tsp olive oil
1/2 tsp lemon juice
2 tsp parmesan cheese (not all parmesan cheeses are certified kosher, but it is possible to find ones that are)
1 clove of garlic, pressed (or garlic salt if you're in a real hurry)
shake of salt
shake of pepper

Method:
Combine all ingredients in a tupperware container. Shake it up. Eat it at room temperature. That's it!


Friday, April 3, 2009

The calendar might say that it's spring..


It still feels like winter in most of Canada. R and I have both been sick with something lately, so I whipped up a batch of my favourite soup. It has two advantages: It freezes will so it can be made in big batches, and you can add just about any vegetable that you have hanging around in your fridge. So if you have some sad looking produce in your crisper, this recipe will give it a good home.

It has morphed beyond all recognition from its original form and now I just toss everything I can find into the pot. I started out using a recipe by Pam Reiss, whose book Soup - A Kosher Collection has a funny personal story behind it. I bought the book one day on a whim because I loved the photos and I was just beginning my love affair with Jewish and kosher food. I brought it home and browsed through it, then left it on the dining room table. R came home and looked at it and said, "Where did you get this!?" I thought that he was just shocked that I was investigating kosher cooking, but it turns out that he knows Pam, the author! They went to school together in Winnipeg where she nows runs a kosher grocery store called Desserts Plus. I got to meet her at a wedding last October and she was incredibly nice. If you're looking for a good soup book I would recommend that you go out and get this book! What I love about it is that it's divided into Dairy, Parve and Meat recipes, and on each page it tells you whether or not the recipe freezes well. It's very helpful.

Anyway. You just want to know how to make this soup, don't you?


Beef Barley Veggie Soup
adapted from Soup - A Kosher Collection

Ingredients:
2 soup bones (if you can't find kosher soup bones you can leave this out)
1 lb stewing beef
8-10 cups of water
1 can whole plum tomatoes
1 onion, peeled and diced
2 carrots, washed and diced
2 parsnips, washed and diced
2 potatoes, washed and diced
1 can of red kidney beans
3/4 cup barley
2 tbsp dried oregano
2 tbsp dried thyme
2 tbsp soy sauce

Method:
1. Cut the stewing beef into 2 inch cubes (or something close to that) and place them in the pot of water. Bring the water to a boil.

2. When it begins to boil you'll notice some icky brown foam rising to the top. Strain it off. You'll have to continue to do this for about 10 minutes. When most of the foam is gone and no more is rising to the top, you can add the rest of your ingredients.

3. Simmer over low heat for at least 2 hours, longer if desired.

Note: Remember that you can add just about anything to this recipe! I've added yams, corn, chick peas, garlic, celery, pasta... And don't forget to freeze half of it. It tastes just as good reheated!

Wednesday, March 11, 2009

A perfectly shaped hamantashen box!

I'm not a huge fan of Martha Stewart most of the time, but I was browsing through her site looking for ideas for wedding favours, and guess what I found!


The picture doesn't give the best idea of it, but it's a triangle shaped box that you can make to give your hamantashen away in. Follow the link below the picture for the pattern so that you can make your own!

Tuesday, March 10, 2009

A recipe from my friend Howard


So as some of you know, I'm a food photographer. Last spring I photographed some recipes for an article in Lifestyle Ontario Magazine with one of my favourite people to work with, Howard Dubrovsky. Howard is vegetarian and so coincidentally all of the recipes that he develops are pretty easy to adapt to a kosher kitchen. Check it out:

Apple Rhubarb Crumble

For Filling:
4 cups of apple, peeled and cut into 1- inch pieces (approx 3-4 apples)
1 1/2 cups rhubarb
3 tbsp flour
1/2 cup plus 2 tbsp sugar

Cut the rhubarb into 1-cm thick slices. Toss all the ingredients together.

For Crumble Topping:
6 tbsp butter (very cold)
1/2 cup sugar
1/3 cup maple syrup
1 cup all purpose flour
Pinch of salt

Break up the flour and butter using your fingertips until the butter is in pea-size pieces. Add the remaining ingredients and mix until the crumble takes on the texture of wet sand (add 1 tbsp of water if the dough is a little dry).

To Assemble: Place the apple mixture in a 9-inch round oven safe baking dish. Gently top the apples with the crumble mixture (do not pack the crumble too hard).

Bake at 400 degrees for 40 minutes.

TIPS:
• Crumble is not pie dough. It should not be an even dough Parts will look like wet sand and others will look more like dry sand.
• Firm apples, such as Granny Smith, work best with this dish.
• More or less sugar can be added to the filling depending on if a sweeter or more tart product is desired. • If the top of the crumble is browning too fast, cover with tin foil.


To me, the best part is that this one is SO EASY to make for pesach/passover. Just sub all of the flour 1:1 with matzo cake meal.


Monday, March 9, 2009

Happy Purim!

Sorry again for the delay in posting another recipe... The last one that I posted was over a month ago! I'm terrible, I know. But for what it's worth, I've been very busy. I just got back from photographing a Jewish deli in Toronto that's been getting a lot of hype: Caplansky's Deli. It's not kosher, but it's kosher style... And it's got to be the only place in Toronto where you can have a pint of beer good beer and a knish! Anyway, Zane Caplansky has a blog and he's a good guy, so you should go his site and read his blog and if you're in Toronto you should go and try his smoked meat sandwich because it really is phenomenal. It beats Shwartz's in Montreal hands down. Seriously. The guy makes his own mustard!

So it's Purim tonight! I'm not going to a Purim party or to a reading of the Magillah (the Book of Esther) because R is working late and I have a lot of work to catch up on here at home. But I did make hamantashen with my niece last weekend, and I'm here today to share my super easy (and not super fattening) recipe for these famous Purim cookies.

Me and Ava making hamantashen.

Hamantashen: (adapted from a recipe by Noreen Gilletz):

Ingredients:

8 tbsp margarine, cut into chunks
8 tbsp 1% cottage cheese
1 cup all purpose flour
2 tsbp sugar
2-3 cups raspberry jam (or other flavour... traditionally these have an apricot or prune filling, but I like raspberries)


Method:

1. Preheat oven to 350F. Combine all ingredients (except for the jam) in a food processor bowl. Process until dough forms a ball on the blades, about 18-20 seconds. Chilling is not necessary.

2. On a well floured surface, roll dough 1/2 inch thick and cut into circles with the top of a juice glass. Place circles on a greased baking sheet and put about a teaspoon of jam in the middle of each circle. Close the top of the circle with a pinch, then pinch both sides and the bottom to form a triangle, leaving the filling exposed in the center.

3. Bake for 25-30 minutes, until lightly browned.

Hamantashen for Purim


So now maybe you're wondering: What is Purim and what are these wonderful jewel-like cookies called hamatashen? Let me share what I've been learning:

Purim a holiday that celebrates another biblical story in which the Jews were supposed to be eliminated but they survived. (Isn't that basically what Channukah was about too?) The bad guy in the story is a guy named Haman who tries to convince the king to kill all of the Jews after one Jew named Mordecai refuses to bow down to him. Haman basically says to the king, "These people are different and they have values that differ from ours and therefore we shouldn't have to tolerate them!" Mordecai's beautiful cousin Esther was married to the king and convinces the king to change his mind and kill Haman instead of Mordecai and the Jews.

There's a sort of "woo, feminism!" thing going on in the story of Purim because back in those days, going before the king without being summoned was punishable by death. So yay for Esther!

So hamatashen are named after Haman, and they're supposed to be shaped like either his ears or his hat depending on who you listen to. Eating hamatashen is supposed to be a way of mocking Haman. Also, during the reading of the Magillah, people bring noisemakers and shake them whenever Haman's name is read so that his name will be blotted out from history. In my opinion, those two things kind of cancel each other out because making the cookies pretty much forces you to say his name out loud, but I get the general idea.

There's also a tradition to dress up. Our rabbi is going to the Magillah reading tonight as Batman in The Dark Knight and the cantor is going as Robin!

One more fun thing about Purim is that you're supposed to get so drunk that you can't tell the difference between "cursed be Haman" and "blessed be Mordecai" although I'm not exactly sure how drunk that is or why it's a commandment. But a lot of people like to get very drunk on Purim. That's another thing that I'll be skipping this year, since I don't think that it's wise to spend the evening editing photos while I'm too drunk to see straight. But don't let me stop you!

Thursday, February 26, 2009

Israel!

R and I have been dreaming of visiting Israel together ever since I got back from my first trip there (with a group of photographers) 3 years ago. Finally, after assessing our financial situation and realizing that we can probably afford it, we booked our tickets.

I'm going back to Israel!

Van Dyke Print - Visitors to the Western Wall
A Van Dyke Brown print from the last time I was in Israel: Abbey Road meets the Western Wall.

And I apologise for my lack of cooking lately, but life has been crazy. I just did a job for Pepsi, and now I'm working on the new Toronto guidebook for Frommer's (I'll share some images from that sometime soon). And we just got back from visiting R's parents for a week in Portland, OR. I love that city. They love a lot of the things that I love: Interior design, coffee, used bookstores, crafting, and trees as tall as skyscrapers.

Stumptown Cafe

Coffee tasting at the Stumptown Annex
A coffee tasting at the Stumptown Annex on SE Belmont St in Portland, OR.

So that's all from here for now. If any of you have been to Israel and know of some good places to eat in Tel Aviv, Jerusalem and up north, let me know!

Sunday, January 25, 2009

Perogies


I love it when I can cook something that impresses other people. I love to hear exclamations of, "Oh wow, this must have taken you all day!" or, "I heard that these are so hard to make!" And I just smile modestly and say, "Oh, it's not thaaaat hard."

But really. Perogies are NOT that hard. You'll be shocked by how easy they are to prepare and how hard they are to screw up.

When I expressed an interest in making them, the first thing that R did was call Baba Luba. She gave us the base for the recipe and we ad-libbed the rest. Luba was especially vague this time around, and basically just said, "Some flour, a little bit of oil, a little salt.... Mix it up, roll it out."

Here's a more precise version of Luba's recipe. These measurements will make about 2 dozen perogies. These have the same qualities as a lot of the Jewish recipes I've come across since starting this blog: They freeze wonderfully, and they seem to get tastier when they sit in the fridge for a few days. So make lots, because chances are that they won't even make it to the freezer. They disappear FAST.

First, the potato-cheese filling:

Ingredients:
5-6 medium sized potatoes (I used yukon gold)
1 cup grated medium or old cheddar cheese
1/2 onion, diced
1 1/2 tsp salt
A pinch of pepper

Method:
1. Peel and chop the potatoes into small chunks.
2. Place them in a pot and fill the pot until the potatoes are completely covered with water. Bring to a boil and continue to boil for about 10 minutes or until the potatoes are soft.
3. In the meantime, fry the onions and grate the cheese.
4. When the potatoes are done, drain them and mash them in a bowl with the onion and cheese. Mix in the salt and pepper.
5. Place in the fridge to cool while you're making the dough.


Note: R also made some blueberry filling and we stuffed a few with that. He simmered some blueberries in butter, then added some vanilla vodka and allowed that to reduce a bit. It smelled heavenly!


Next, the dough:

Ingredients:
5 cups of all purpose flour
2 tsp of salt
4 eggs
1/3 cup canola oil
1 cup warm water

Method:
1. In a large bowl, mix flour and salt together.
2. In another bowl, beat the eggs well and then add the canola oil and warm water and mix again.
3. Add the liquid mixture to the flour mixture about 1/2 a cup at a time, mixing constantly, until all of the liquid mixture is combined. The dough should feel soft and slightly elastic. It shouldn't be gloopy at all. If it is, add more flour.


Now, the assembly:

1. On a floured surface, roll out the dough until it's slightly thinner than corrugated cardboard. It's best if there isn't TOO much flour, since you'll need to roll it out again (see 2nd step), and adding flour makes the dough tougher each time.
2. Using a drinking glass as a guide, cut the dough into circles. When you have no space to cut more circles, bunch the dough up and roll it out again. Keep doing this until you've got no dough left.
3. Take the first circle and roll it out so that its diameter is increased by about an inch. You don't want it to be paper thin because it may rip while you're boiling it, but if it's too thick it will feel chewy.
4. Place about 1 1/2 tbsp of the filling inside, then fold the circle in half and pinch the sides closed. After you've done this a few times you'll get an idea of just how much filling you can stuff into your perogies and you might want to try putting a bit more than 1 1/2 tbsp.
5. Boil a pot of water and when it has come to a rolling boil, drop your perogies into the water. They're ready to be taken out when they start to float.


At this point you could choose to eat them as they are, but I like to fry mine in a bit of canola oil. It's best to do this over medium to low heat so that they don't stick to the pan.


See how easy it is? Go on, try it out and impress your friends!


Saturday, January 3, 2009

Sweet indulgence.


Well, I finally caught the flu that's being passed around and I've spent most of the past two days being as inactive as possible while still trying to be productive. Today I'm going through my hard drive and cleaning things up. Lucky for you folks, I found one of my favourite cookie recipes while I was rooting around.

These having nothing to do with anything related to my kosher cooking journey, but I thought that I'd share them anyway since they're delicious.


This recipe is adapted from More From Magnolia: Recipes from the World Famous Bakery and Allysa Torey's Home Kitchen, but I tried to healthy it up a little bit by eliminating the shortening, using 1/2 whole wheat flour and subbing 1/2 of the refined sugar with raw sugar. R had been trying to avoid sweets but I always want to share my food with him, so I try my best to make him feel less guilty about eating it.

INGREDIENTS:

1/2 c whole wheat flour
1/2 c all purpose flour
6 tbsp Dutch process cocoa
1/2 tsp baking powder
1/4 tsp salt

1/2 c margarine (at room temperature)
1/2 c white sugar
1/3 c raw sugar

1 large egg (at room temperature)
1 tsp vanilla

1/2 c chocolate chips


METHOD:

1. In a small bowl, mix together flour, cocoa, baking powder and salt. Set aside.

2. In a large mixing bowl, beat margarine and sugar until sorta fluffy. Add egg and vanilla. Mix well.

3. Stir in chocolate chips.

4. Drop rounded teaspoonfuls onto greased cookie sheet. Chill in the fridge for 20 minutes.

5. Preheat oven to 350.

6. Bake for 10-15 minutes.

They'll seem undercooked when you take them out (like, if you poke one you'll leave a finger sized crater), but don't worry because they get harder as they cool. Let them cool on the baking sheet for 5 minutes, then transfer them with a spatula to a wire rack or some waxed paper and let them cool for another 10 minutes.


To see more of my food photography, visit my website: Robin Sharp Photography