Sunday, January 25, 2009

Perogies


I love it when I can cook something that impresses other people. I love to hear exclamations of, "Oh wow, this must have taken you all day!" or, "I heard that these are so hard to make!" And I just smile modestly and say, "Oh, it's not thaaaat hard."

But really. Perogies are NOT that hard. You'll be shocked by how easy they are to prepare and how hard they are to screw up.

When I expressed an interest in making them, the first thing that R did was call Baba Luba. She gave us the base for the recipe and we ad-libbed the rest. Luba was especially vague this time around, and basically just said, "Some flour, a little bit of oil, a little salt.... Mix it up, roll it out."

Here's a more precise version of Luba's recipe. These measurements will make about 2 dozen perogies. These have the same qualities as a lot of the Jewish recipes I've come across since starting this blog: They freeze wonderfully, and they seem to get tastier when they sit in the fridge for a few days. So make lots, because chances are that they won't even make it to the freezer. They disappear FAST.

First, the potato-cheese filling:

Ingredients:
5-6 medium sized potatoes (I used yukon gold)
1 cup grated medium or old cheddar cheese
1/2 onion, diced
1 1/2 tsp salt
A pinch of pepper

Method:
1. Peel and chop the potatoes into small chunks.
2. Place them in a pot and fill the pot until the potatoes are completely covered with water. Bring to a boil and continue to boil for about 10 minutes or until the potatoes are soft.
3. In the meantime, fry the onions and grate the cheese.
4. When the potatoes are done, drain them and mash them in a bowl with the onion and cheese. Mix in the salt and pepper.
5. Place in the fridge to cool while you're making the dough.


Note: R also made some blueberry filling and we stuffed a few with that. He simmered some blueberries in butter, then added some vanilla vodka and allowed that to reduce a bit. It smelled heavenly!


Next, the dough:

Ingredients:
5 cups of all purpose flour
2 tsp of salt
4 eggs
1/3 cup canola oil
1 cup warm water

Method:
1. In a large bowl, mix flour and salt together.
2. In another bowl, beat the eggs well and then add the canola oil and warm water and mix again.
3. Add the liquid mixture to the flour mixture about 1/2 a cup at a time, mixing constantly, until all of the liquid mixture is combined. The dough should feel soft and slightly elastic. It shouldn't be gloopy at all. If it is, add more flour.


Now, the assembly:

1. On a floured surface, roll out the dough until it's slightly thinner than corrugated cardboard. It's best if there isn't TOO much flour, since you'll need to roll it out again (see 2nd step), and adding flour makes the dough tougher each time.
2. Using a drinking glass as a guide, cut the dough into circles. When you have no space to cut more circles, bunch the dough up and roll it out again. Keep doing this until you've got no dough left.
3. Take the first circle and roll it out so that its diameter is increased by about an inch. You don't want it to be paper thin because it may rip while you're boiling it, but if it's too thick it will feel chewy.
4. Place about 1 1/2 tbsp of the filling inside, then fold the circle in half and pinch the sides closed. After you've done this a few times you'll get an idea of just how much filling you can stuff into your perogies and you might want to try putting a bit more than 1 1/2 tbsp.
5. Boil a pot of water and when it has come to a rolling boil, drop your perogies into the water. They're ready to be taken out when they start to float.


At this point you could choose to eat them as they are, but I like to fry mine in a bit of canola oil. It's best to do this over medium to low heat so that they don't stick to the pan.


See how easy it is? Go on, try it out and impress your friends!


Saturday, January 3, 2009

Sweet indulgence.


Well, I finally caught the flu that's being passed around and I've spent most of the past two days being as inactive as possible while still trying to be productive. Today I'm going through my hard drive and cleaning things up. Lucky for you folks, I found one of my favourite cookie recipes while I was rooting around.

These having nothing to do with anything related to my kosher cooking journey, but I thought that I'd share them anyway since they're delicious.


This recipe is adapted from More From Magnolia: Recipes from the World Famous Bakery and Allysa Torey's Home Kitchen, but I tried to healthy it up a little bit by eliminating the shortening, using 1/2 whole wheat flour and subbing 1/2 of the refined sugar with raw sugar. R had been trying to avoid sweets but I always want to share my food with him, so I try my best to make him feel less guilty about eating it.

INGREDIENTS:

1/2 c whole wheat flour
1/2 c all purpose flour
6 tbsp Dutch process cocoa
1/2 tsp baking powder
1/4 tsp salt

1/2 c margarine (at room temperature)
1/2 c white sugar
1/3 c raw sugar

1 large egg (at room temperature)
1 tsp vanilla

1/2 c chocolate chips


METHOD:

1. In a small bowl, mix together flour, cocoa, baking powder and salt. Set aside.

2. In a large mixing bowl, beat margarine and sugar until sorta fluffy. Add egg and vanilla. Mix well.

3. Stir in chocolate chips.

4. Drop rounded teaspoonfuls onto greased cookie sheet. Chill in the fridge for 20 minutes.

5. Preheat oven to 350.

6. Bake for 10-15 minutes.

They'll seem undercooked when you take them out (like, if you poke one you'll leave a finger sized crater), but don't worry because they get harder as they cool. Let them cool on the baking sheet for 5 minutes, then transfer them with a spatula to a wire rack or some waxed paper and let them cool for another 10 minutes.


To see more of my food photography, visit my website: Robin Sharp Photography

Wednesday, December 31, 2008

Challah for lazy people.

I might be converting to Judaism, but my family isn't so I attended 2 Christmas dinners this year - one with my mom and one with my dad. Because my mom is interested in my conversion and wants me to share all of the stuff that I'm learning with her, I decided that she might be happy to try some of my newly aquired Jewish recipes. I baked a loaf of challah and brought it with me to our Christmas dinner. She loved it and saved the leftovers to make sandwiches with (there weren't many because my sister also got excited about the challah: "Is this that Jewish bread? I love this stuff!").

It still requires work, but making your challah dough in the bread machine saves you some of the hassle. I do most of my bread doughs in the bread machine. It's just easier and I've never noticed a decline in taste or quality. Then again, it's not like I'm a bread connoisseur or anything.


So here we go with the recipe:

BREAD MACHINE CHALLAH

Ingredients:
1 cup water
2 egg yolks
1 egg
4 tbsp butter (or shortening if you want it to be parve)
3 tbsp sugar
1-1/4 tsp salt
3-3/4 cups white flour
1 tsp bread machine yeast

Method:
1. Measure first 8 ingredients in the order listed into your bread maker.
2. Select the dough/pasta setting and press start.
3. When the cycle is complete, remove dough from machine to a lightly floured surface.
4. Divide dough into 6 equal portions. Roll with palm of hand into long smooth strips. The pieces should be thicker in the middle and gradually taper towards the ends. Braid the 6 dough strips. Place on lightly greased baking sheet.
5. Cover and let rise for 30 minutes or until double in volume.
6. Beat another egg and brush over challah. Bake at 350F for 30-35 minutes.

Notes:
-I like to make things slightly more healthy by using a combination of white and whole wheat flour, but you really can't do that with this one. You need to use all white flour to get the right texture.
-If you need help figuring out how to braid your challah, there's a great video here!

Thursday, December 25, 2008

Costa Rica, and the quest for Yuca Latkes.


Toucan.  Not King Billed...  What's the other?
A Chestnut-Mandibled Toucan... Not a King Billed Toucan, which is what Toucan Sam is.

R and I were in Costa Rica last week, so I wasn't able to wish you all a Happy Hanukkah on the first night. But here I am, finally: Home in Canada where the snow is plentiful. Our flight home was delayed by 2.5 hours and we got home at 5am on Tuesday morning. I'm sure that I'm still trying to catch up on the sleep that I missed because of this.

We pretty much only did two things in Costa Rica: We hiked and we ate. We stayed mostly inland (where it's not especially hot) and spent our time near Lake Arenal where there's an active volcano that erupts more than once a day, and in the Monteverde Cloud Forest Reserve, where there a a lot of really cool birds and animals.

There were a few things about their traditional cuisine (or, as they call it, "typical food") that I really loved, but I'll stick to the things that you could probably bring into a kosher kitchen (and if any of this is definitely NOT kosher for some reason, please comment and let me know!):


Yuca: This was my favourite. For breakfast at one of our hotels, we were served little discs that looked a lot like potato latkes. After taking a bite I got curious and asked the women in the kitchen what it was made of. Yuca! Yuca is a tuber and is used in place of potatoes in Central America because it's more readily available. We had yuca in a number of different ways, but my favourite was definitely the yuca "latkes". I'll definitely be working on a recipe for those in the weeks to come, but if anyone has one to share I'd sure appreciate it!

Heart of Palm: I'd never had it before we went to Costa Rica and it's great. The flavor is hard to describe, but the texture is firm yet smooth. It's crunchy, but not in the same way that a carrot or a piece of celery is crunchy. It's really good, but it's apparently very expensive to buy in North America. Once I have a chance to go to the Asian or Latin American market near my house I'll confirm or deny this.

Guanábana: Called Soursop in some places, guanábana is a huge fruit that is green on the outside and white with large black seeds on the inside. Because of the seeds, the flesh is difficult to eat and the fruit is usually blended with water to make a smoothie of sorts. We drank guanábana con agua just about every day that we were on vacation. It has a really unique taste and you could compare it to coconut or banana or strawberry, but it doesn't really taste like any of those things. In Costa Rica it's pretty common to find guanábana flavoured Tang in grocery stores, which I thought was really funny for some reason.

Gallo Pinto: Directly translated, gallo pinto means "spotted rooster", which is cute because that's kind of what it looks like. Gallo pinto is rice with black beans and I think that I ate more beans and rice during my stay in Costa Rica than I ever have in my life. They serve gallo pinto with almost every meal, and it made a great breakfast when we were heading out for a big hike because it's full of carbs and protein. I liked eating mine with scrambled eggs and fresh avocado. The avocado in Costa Rica is amazing because it's actually tree ripened, instead of on-your-counter-in-a-brown-bag ripened.


The poor man's umbrella
Poor Man's Umbrella in the Monteverde Cloud Forest Reserve.


Tuesday, December 9, 2008

Challah. Holla!

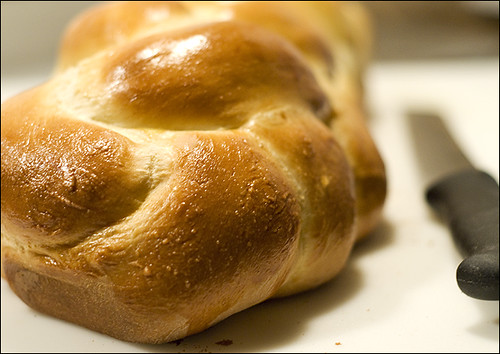
Yes, I made my first challah on the weekend. I cheated a bit and made the dough in my bread machine, but I braided and baked it myself. The texture was fantastic but it wasn't as egg-y as I was expecting it to be. I think that I need a better recipe. I'm not even happy enough with this one to post a recipe at all. But I will share the video that I used to figure out how the HECK I was supposed to make a six-braid challah:


That was definitely helpful, but even after that I had to get R to help me with it because I couldn't wrap my brain all the way around the idea. I'm too used to braiding hair. Braiding bread is pretty different!

challah.  holla!


I've been pretty busy in the kitchen lately, but I've been busy everywhere so it's hard to find the time to post about my creations. We're leaving for a trip to the Cloud Forests in Costa Rica on Monday, but I'll try to squeeze another post in before then.

Tuesday, November 25, 2008

Beef and Lamb Holishkes (Cabbage Rolls)

I found a great article today on TheKnish.com today about a guy who ate nothing but Jewish foods for a month and apparently became incredibly healthy while doing so.

Just another reason to follow my blog, folks!

Honestly though, I'd take the article with a grain of kosher salt. I'm not entirely convinced that eating a steady diet of Jewish food would be better for me than my current diet, but I'm sure that Jewish food nourishes me in a different way.

In order for me to explain what I mean, I should tell you that I've started my conversion classes. I've been reading about Shabbos (the Sabbath, or the Holy Day - a day of rest sort of like Sunday for Christians) and the process of a typical Shabbat dinner, and I'm pretty excited about doing all of that soon.

I think that it's interesting that there are so many brachot (blessings) that can be said over food; not just on Shabbos, but every day. Jews have blessings for everything: Sugar, spices, nuts, ripe fruit, new fruit, wine, challah/bread, cakes, juice, and on and on forever. To me, this is just more proof that the Jews adequately enjoy and appreciate their food. And not only that, but their food doesn't just nourish their bodies, it nourishes their souls and gives meaning to their meals. Thanking G-d for a meal reminds you that it is not there just because you cooked it. It creates a moment for you to pause and truely appreciate your food and, essentially, your life.

Now you understand why I say that Jewish food nourishes me in a different way.

Here's a great recipe for beef and lamb holishkes and will nourish both your body and your soul. R would like me to point out that this is
his recipe, not his bubbe's or my own. :) He likes to get creative with his cooking and he loves ground lamb, but he made this recipe with only lamb once and found that the taste was incredibly overpowering. The combination of beef and lamb is wonderful, though.


They may not be the most photogenic little things, but I assure you that the taste more than makes up for it.

Ingredients:

1 head of green cabbage
1 can of tomato paste
3 cups of water
Meat mixture for stuffing

Meat Mixture:
1 lb lean ground beef
1/2 lb ground lamb (if not available, just increase ground beef to a total of 1.5 lbs)
red chili flakes (a few shakes)
1 large carrot, diced
4 cloves garlic, diced
1/2 white onion, diced
1 can whole tomatoes
1/4 cup cranberry juice OR 3 splashes red wine vinegar (only if using ground lamb)
3 bay leaves
1 tsp oregano
1/2 tsp thyme
salt, pepper to taste
2 cups cooked rice

Method:
  1. Heat up a large frying pan on medium-high heat and add some canola oil. brown onion and garlic with the chili flakes.
  2. Add meats and cook until the pink is gone. add rest of veggies and cook on medium high heat until it starts to simmer. Once simmering, turn heat down to low.
  3. Add in herbs and bay leaves and let it cook for 30 minutes, occasionally stirring and trying to mash up softened tomatoes.
  4. Taste and add additional spices if desired. Set aside.
  5. Rinse your green cabbage and remove the first bunch of leaves - The ones on the surface are too big to use for cabbage rolls.
  6. Fill a large pot 3/4 full with water and carefully drop the cabbage inside the pot then bring to a boil. I don't know how the real bubbes do it, but R stabs the cabbage with a large serving fork and boils the cabbage with the fork intact, which makes it easy to lift the cabbage out of the pot again when it's finished.
  7. Once the water starts to boil, reduce the heat and put the lid on the pot, and cook for another 10 minutes or so.
  8. Now remove the cabbage from the pot and start to pull leaves off. This is where I find that it's helpful to work quickly, because the leaves are easier to work with when they're still warm.
  9. To make the cabbage rolls: Put 1-2 tbsp of the meat mixture into a cabbage leaf and fold it like a burrito (see photos), then place it with the seam facing down in a casserole dish. Continue this process for the rest of the leaves until you've used up all of your meat.
  10. In a large bowl, mix together the tomato paste with the water. Add more water if you need to. It should look like tomato soup when it's done. Pour the tomato mixture over the cabbage rolls. It should almost completely cover them.
  11. Cover the casserole dish with foil and bake in the oven at 350F for about 1 1/2 hours.


These get better with time. They're great for lunch the next day (if your co-workers don't shun you for making the microwave smell like cabbage). Baba Luba affirms that they get much better after spending a few weeks in the freezer.

Monday, November 10, 2008

Could I have a blog about Jewish food without mentioning matzo balls? I think not.

In the very first post to this blog, I gave you the recipe and directions for making Baba Luba's chicken soup. Well, I made it again this weekend, and this time I did it right. I made it with matzo balls.

I have to admit: The first time that I had matzo balls, I was disappointed. Before my first Jewish family dinner with R and his family, everybody kept talking about "motza ball" soup and how it was a staple at the dinner table at just about every holiday. Not knowing anything about Jewish food or about kosher laws at this point, I was expecting mozzarella balls in my soup! When I got a fluffy ball of what tasted like bread, I was confused. You can't blame me, can you?

I soon learned that matzo is the substitute for bread during the Jewish holiday of Passover, when eating chametz - ie, bread and leavened products—is forbidden. Matzo balls are made from matzo meal, which is used in place of flour and other grains during Passover. Matzo meal is definitely not a replacement for flour, though. It resembles bread crumbs more than anything. I actually used a mix of matzo meal and bread crumbs in my last recipe for cauliflower latkes, and they could easily be made kosher for passover by using all matzo instead of doing a half-and-half mix.

Matzo balls, once you know what to expect, are fantastic. They make their way into Jewish dinners all year round - Not just on Passover. They're a good substitute for noodles, although I sometimes put both in my chicken soup because I just love carbs that much. Everybody likes their matzo balls a different way. R's brother's mother-in-law likes to make hers so fluffy that they fall apart before your spoon even touches them. R likes his so dense and firm that they weigh as much as my little sister and you'd need a chisel to break them apart.

This recipe yeilds matzo balls that are kind of in the middle. Not too hard, not too soft. Just the way that Goldilocks would make hers.

I got the recipe from the back of the Streit's Mazto Meal box. Why mess with a classic?

Ingredients:

1 cup Streit's Passover Matzo Meal
4 large eggs
1/4 cup oil or melted margarine (I used oil)
1/4 cup of water of seltzer (I used water)
1 tsp salt, or to taste (I added about 1 1/2 tsp in the end)
Pinch of ground pepper.


Method:
  1. Beat eggs. Add water, oil, salt and pepper. Mix well. Add matzo meal and stir thoroughly. Refrigerate for 1/2 to 1 hour.
  2. Partially fill a large pot with water and bring to boil. Moisten palms with cold water.
  3. Form mixture into balls about 1 inch diameter, drop matzo balls into boiling water. When all the matzo balls are in the pot, reduce heat to low. Simmer covered for about 30 minutes or until done. Remove with slotted spoon to a large bowl. Store in a cool dry place. Close spout after use to keep product fresh.


Serve these in chicken soup with egg noodles and garnish with fresh dill. I can't think of a better winter-time lunch than this! It's the ultimate comfort food.